Efficient user management is key to maintaining security, accountability, and streamlined workflows within Ascora. With Ascora, you can create unlimited users and assign them Web Access roles based on their level of responsibility. These roles—Administrator, Supervisor, and Scheduler—define what areas of the system each user can access and manage.
Administrator
- Has access to all areas in Ascora and can set user permissions
- This is the role to be selected for the owner of the business or a manager or director
Supervisor
- Cannot access all settings under the Administration menu except User.
- Can view User and add leave or license details but cannot edit user permissions.
- Can access My Account which has access to Ascora subscription details, payment details, and Ascora invoices
- This can be accessed by clicking the Email address on the upper right of the Ascora screen → My Account.
Scheduler
- Cannot access all settings under the Administration menu except User.
- Can view User and add leave or license details but cannot edit user permissions.
The following table shows an overview of the three web roles and their corresponding access.
| Functionalities | Administrator | Scheduler | Supervisor |
|---|---|---|---|
| My Account | ✅ | ❌ | ✅ |
| Administration | ✅ | ❌ | ❌ |
| Reports | ✅ | ✅ | ✅ |
| Advanced | ✅ | ✅ | ✅ |
| Equipment | ✅ | ✅ | ✅ |
| Inventory | ✅ | ✅ | ✅ |
| Invoices | ✅ | ✅ | ✅ |
| Jobs | ✅ | ✅ | ✅ |
| Quotes | ✅ | ✅ | ✅ |
| Enquiries | ✅ | ✅ | ✅ |
| Customers | ✅ | ✅ | ✅ |
| Tracking | ✅ | ✅ | ✅ |
| Map | ✅ | ✅ | ✅ |
| Scheduler | ✅ | ✅ | ✅ |
| Dashboard | ✅ | ✅ | ✅ |
1. To enable/disable permissions, go to Administration → Users → click View beside the user name and tick the box beside the permission you need to enable and untick if you choose not to grant that permission.
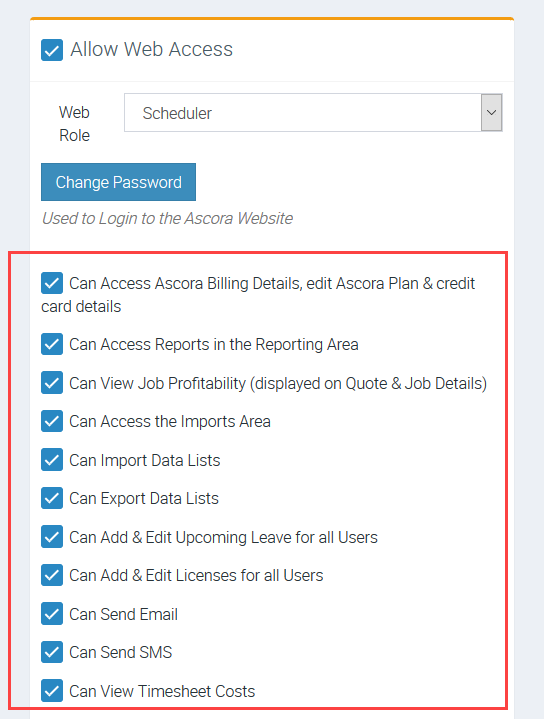
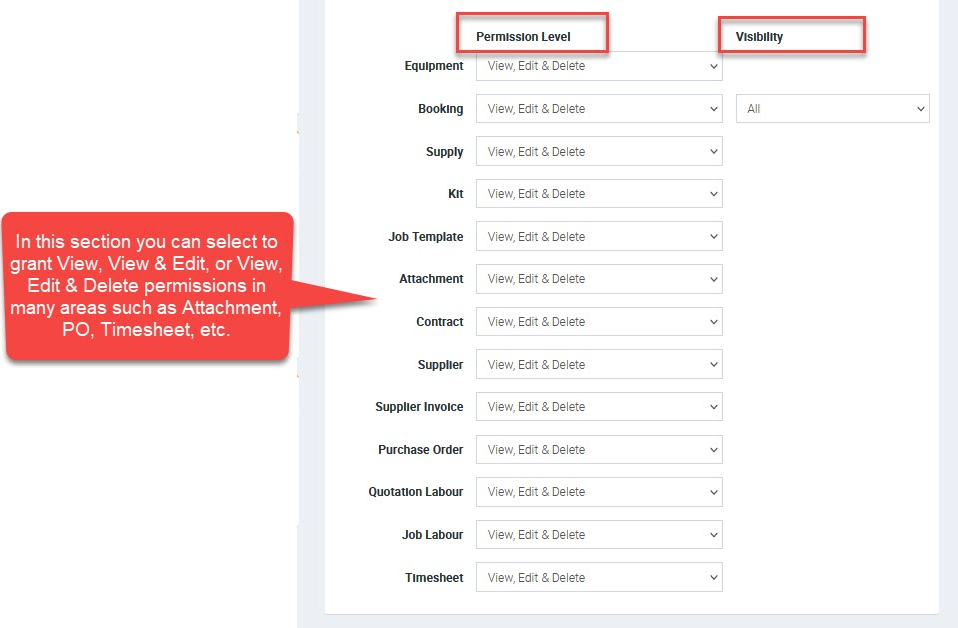
2. In the following section, you can adjust permission levels such as a user having the ability to only view attachments but unable to delete or a user with access to view timesheets but unable to edit or delete. Make sure to check the other areas and ensure that you don't grant unnecessary permissions especially the "Delete" option to prevent accidental deletion of attachments, supplies, booking details, etc.
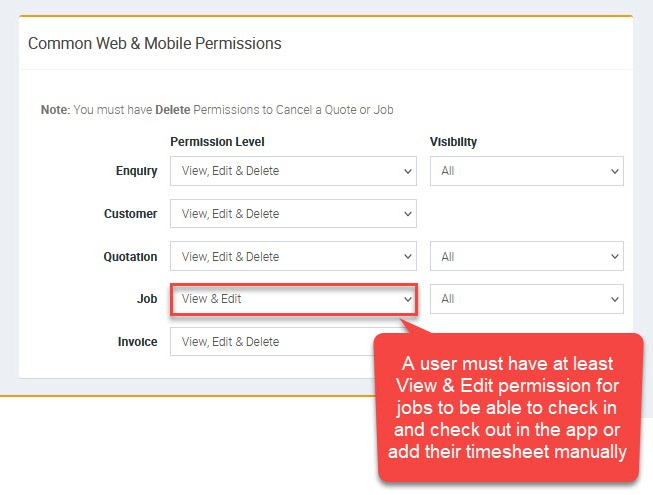
3. In the Common Web & Mobile Permissions you need to select the corresponding user permissions.
When there is no permission selected for jobs, users cannot check in or check out in the app or are unable to add timesheet entries.
4. Once you're done updating permissions and permission levels, click the Save button located on the upper right part of the screen.

Got a question?
Submit an Idea 💡 Go to Ideas Portal