Managing customer equipment efficiently is crucial for ensuring proactive maintenance, compliance, and operational reliability. With Ascora, you can track, monitor, and maintain assets, keeping a complete history of service records, locations, and warranty details—all in one place.
Whether you're importing equipment data in bulk, setting up recurring service intervals, or performing compliance tests, Ascora provides a structured and automated approach to equipment management. This ensures that your team can easily locate assets, prevent service delays, and maintain detailed records for better decision-making.
By leveraging Ascora’s equipment tracking tools, your business can increase efficiency, minimize downtime, and enhance customer satisfaction through seamless service scheduling and asset monitoring.
📽 Watch the video guides ⤵
Mobile Guide
Examples of Equipment includes:
- Air-conditioning Units
- Emergency Lighting
- Machinery
- Pumps and filters
- Pools
Importing Customer Equipment
Equipment can be imported via an Excel Workbook downloaded from the Customer List.
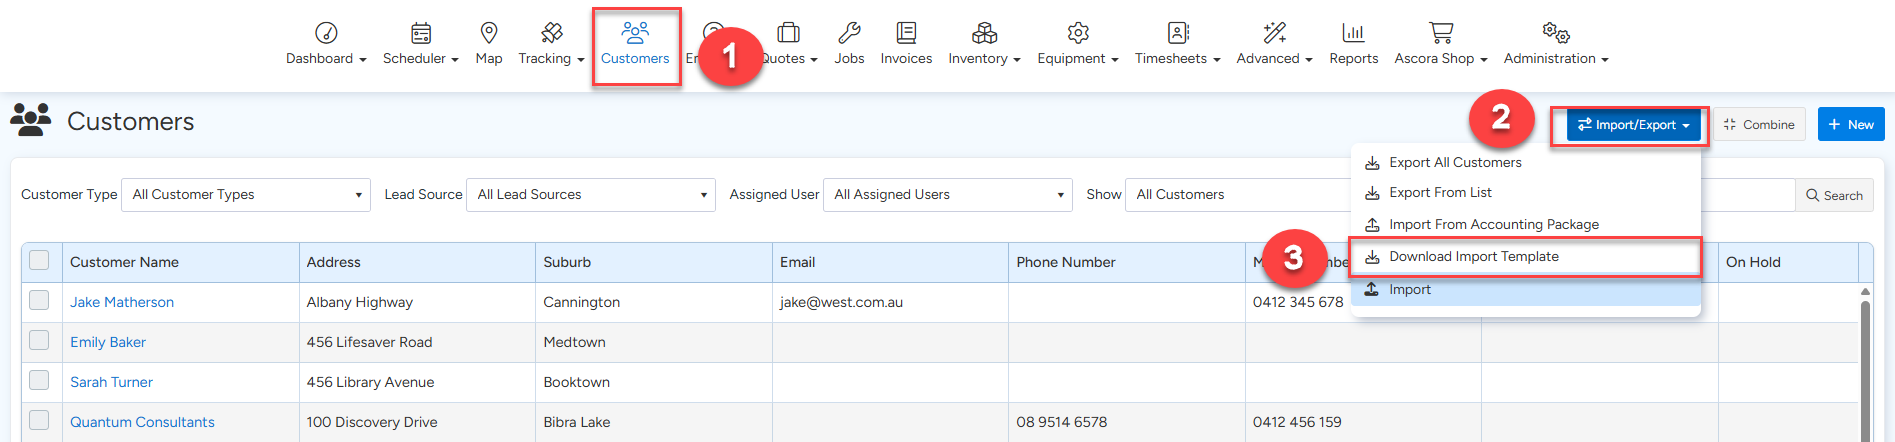
- Click on Customers in the Main Navigation.
- Click on the Import/Export menu
- Click Download Import Template.
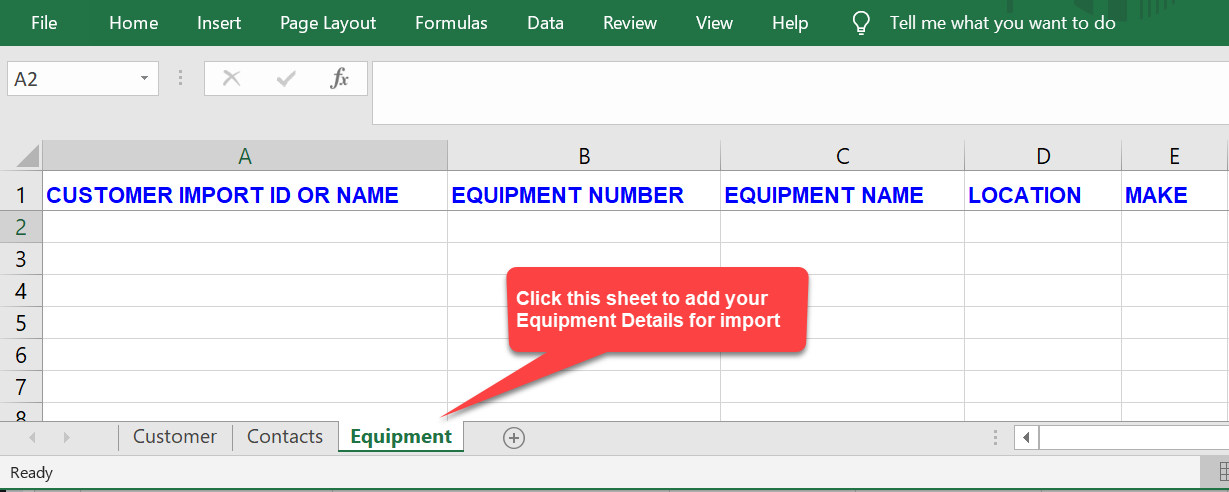
There are 3 tabs in the Import Template:
- Customer – helpful in creating additional sites if needed.
- Contacts – enables you to create Site Supervisors, managers or other Contacts linked to the Customers.
- Equipment – Details of the Equipment or Assets that will be serviced.
See the image below showing the import template and one of the sheets is "Equipment" where you need to enter your equipment details for import. Disregard the other tabs as we're focusing on importing equipment in this user guide.
3. Enter the Equipment Details:
| Column | Header Name | Description | Required |
|---|---|---|---|
| A | Customer Import ID or Name | Name of the Site Customer or Customer where the Equipment is physically located. | Yes |
| B | Equipment Number | Unique number for the Equipment at this Site. E.g. AC1, EML01 | Yes |
| C | Equipment Name | Descriptive Name of the Equipment | No |
| D | Location | Details of where the Equipment is on site. E.g. Near main stairs | No |
| E | Make | Indicate the make or manufacturer | No |
| F | Model Number | Model Number of the Equipment | No |
| G | Serial Number | Serial Number of the Equipment | No |
| H | Supplier | Related Supplier | No |
| I | Equipment Type | Represents the Type of Equipment. For example, Emergency Lighting. | Yes |
| J | Installation Date | Date on which the Equipment was installed | No |
| K | Commission Date | Commissioning date of the Equipment if applicable. | No |
| L | Warranty Expiry | Date of Warranty Expiry | No |
| M | Service Period Start | This is the equipment field called "First Service In Ascora" This becomes the starting point for calculating the next service interval. For example, if you have Service Period Start or First Service Date as 15/01/2023 and equipment has a monthly service interval, the system calculates the next service date as 15/02/2023. If there is no date entered, Ascora uses the very first job completion date as the First Service Date. | Yes |
| N | Service Period End | End of the Service Period. Note: If specified Ascora will not create services automatically after this date. | No |
| O | Notes | Free text describing the Equipment | No |
| P | Barcode | This is optional if you want to easily add equipment to jobs while on site by using the Scan Barcode feature in the app | No |
- The Customer and Equipment Number shall be used to determine if the Equipment already exists in Ascora. If an existing Equipment was found it will be updated rather than creating a duplicate.
- Equipment Type determines the frequency at which the Equipment is serviced.
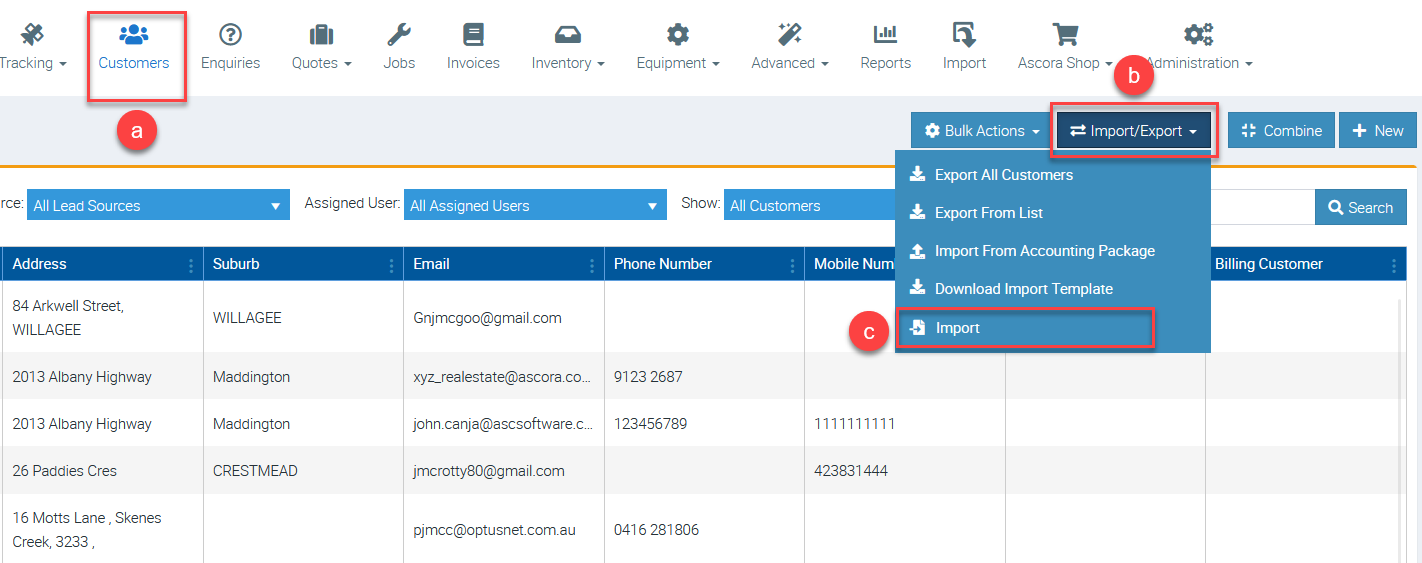
4. Save the Import file and in your Ascora account, navigate to the Customers → Import/Export then click Import and select your import file. Ascora will commence importing the specified details.
Ascora will now process the Customers, Contacts and Equipment from the Excel Workbook and created/update the necessary records.
Enabling Pass/Fail tests
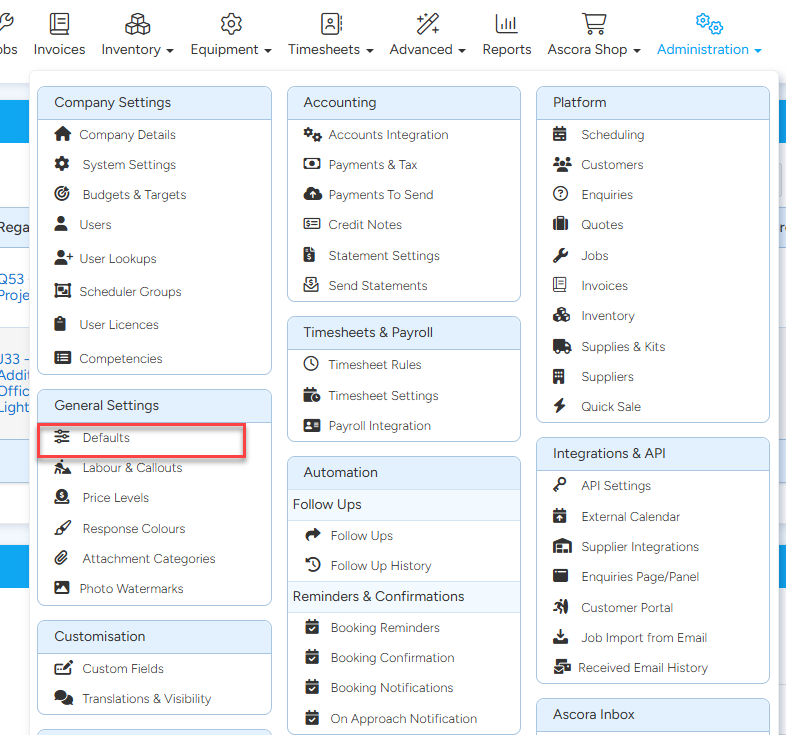
Some Equipment only requires a basic Pass/Fail result with comments. This can be enabled under the Administration menu → Defaults.
1. Under the Administration menu, click on Defaults.
2. Click on Equipment & Maintenance
3. Tick the Enable Pass/Fail checkbox.
4. Click Save
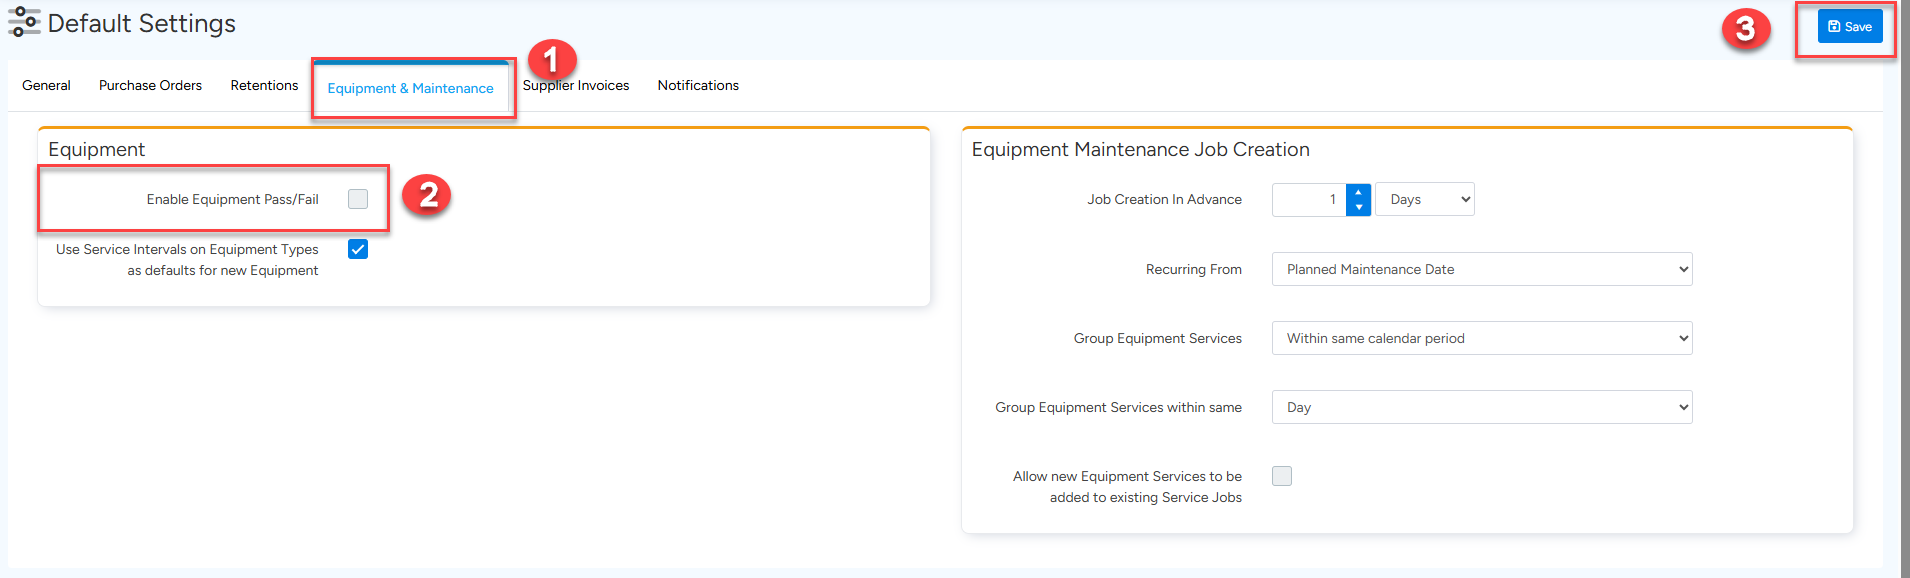
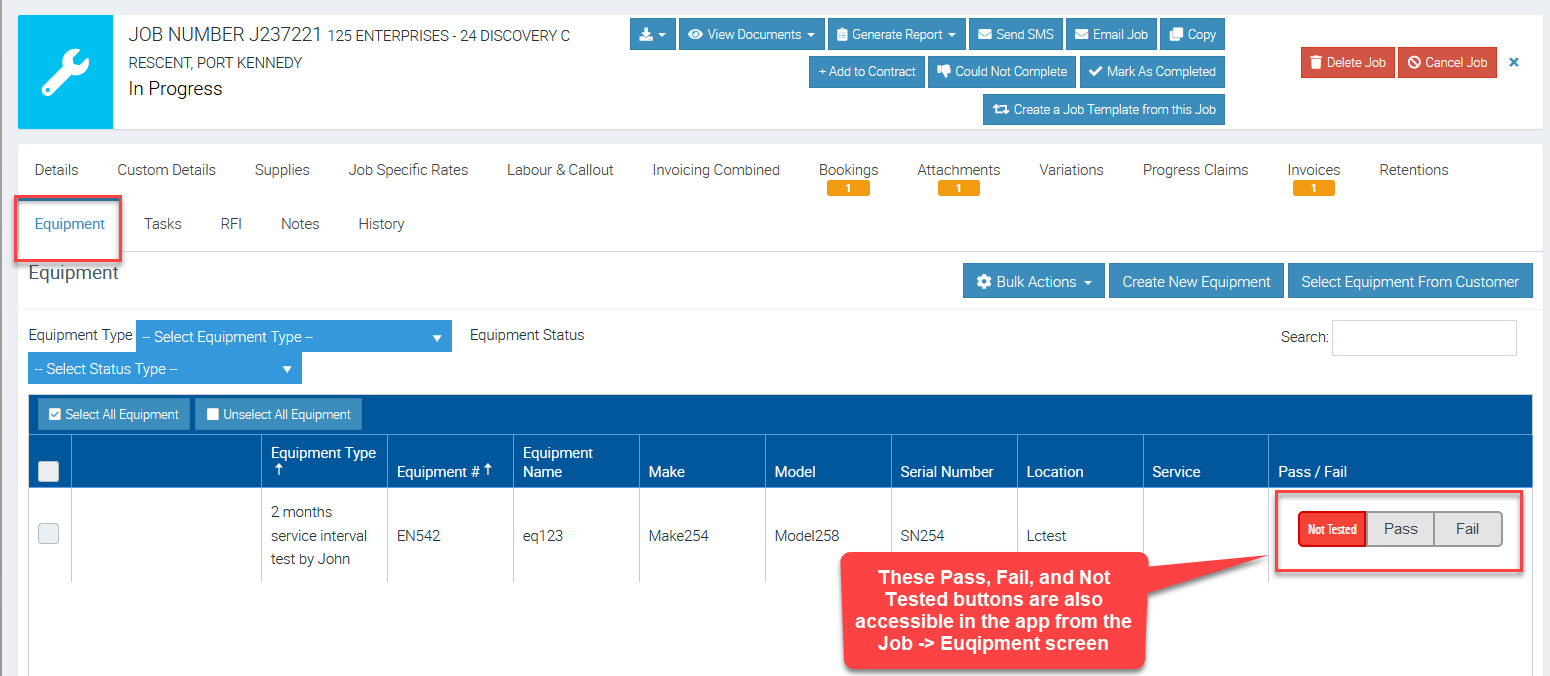
Not Tested / Pass / Fail will now be displayed on all Job Equipment in the system on both the Ascora Web and Mobile Apps.
You can also add custom fields per equipment type and edit your template to show the custom fields. Pleas see 🔣 Custom Fields guide for more information.
Template Types
Equipment Record – display the Pass/Fail results and details for all Equipment regardless of Test Status.
Equipment Defect Record – will display only those Equipment who have failed the tests.
Equipment Types
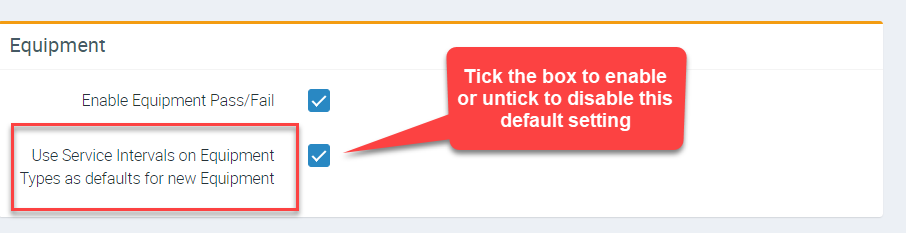
Equipment Types can have service intervals created and linked to them and they work like templates. You can also enable or toggle the following setting in Administration → Defaults. → Equipment & Maintenance
- Use Service Intervals on Equipment Types as defaults for new Equipment
You can create as many service intervals per equipment type as needed.
When editing an Equipment Type, selecting a Service Interval will display the details below.
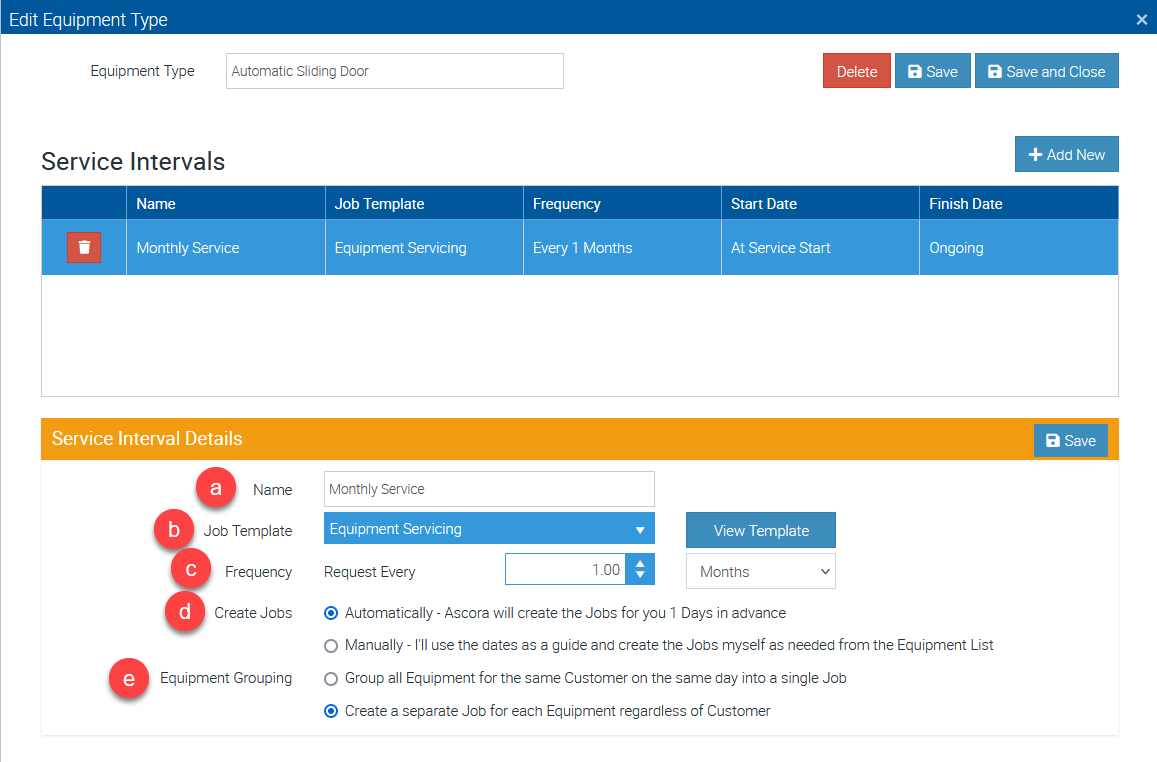
a. Name - Enter the Service Interval Name such as Monthly Service, Yearly Service, etc.
b. Job Template - select a job template that must have been readily created in the Advanced → Job Templates area.
c. Frequency – How often the Interval occurs.
d. Create Jobs – Specify whether you want Ascora to automatically create the necessary Jobs based on the Service Interval or if they will be manually created via the Maintenance Planner.
e. Equipment Grouping – Specify if a Job should be created for each piece of Equipment or if the multiple pieces of Equipment for the Customer that have the same Service Date should be grouped onto a single job.
Adding Service Intervals in Equipment Screen
We can add service intervals per equipment and this allows us to add multiple service intervals if needed.
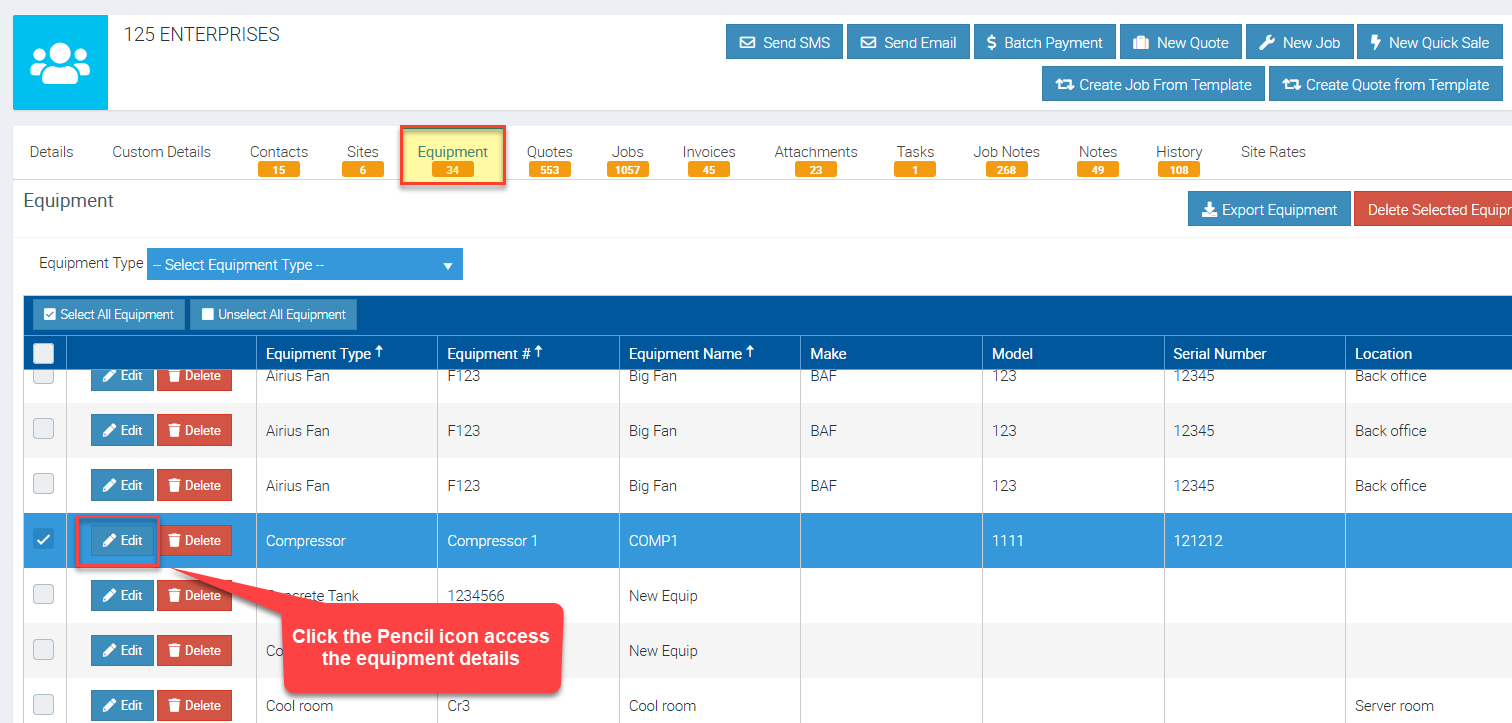
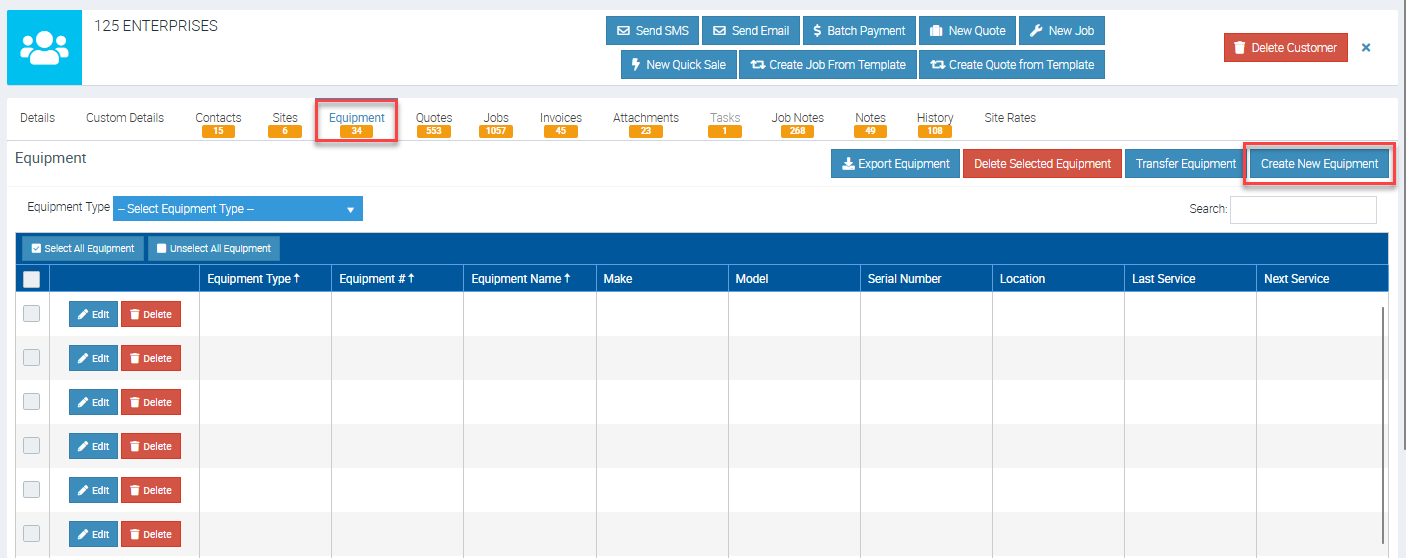
1. Access the Customers menu and search the customer with equipment you need to edit (to add service intervals). Equipment are generally linked to site customers where they are physically located but there might be some cases when you also have equipment linked to parent customers or billing customers.
In this example we are accessing the details of a parent customer called 125 Enterprises.

2. Navigate to the Equipment tab and click on the Pencil icon beside the equipment name to access the details.
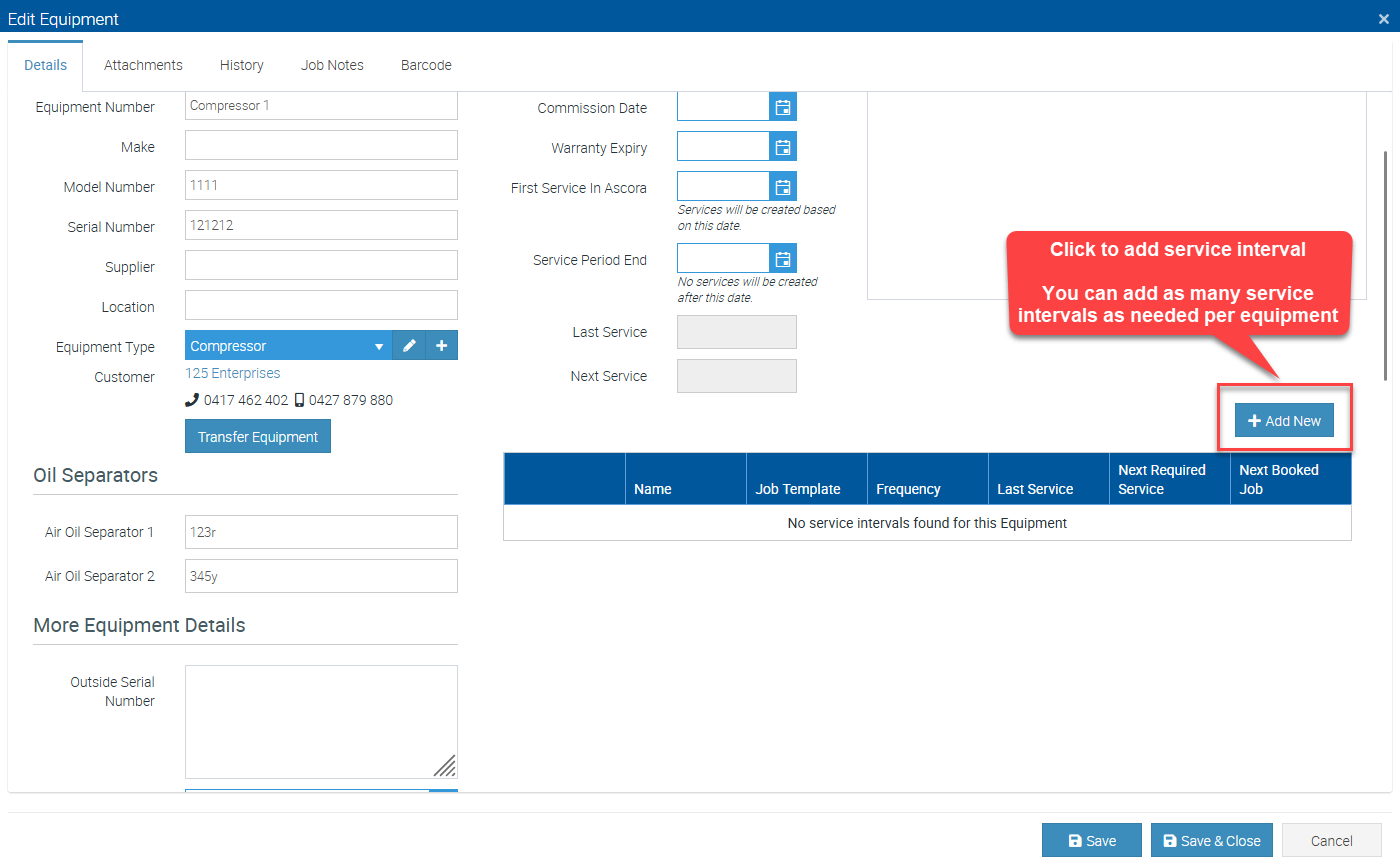
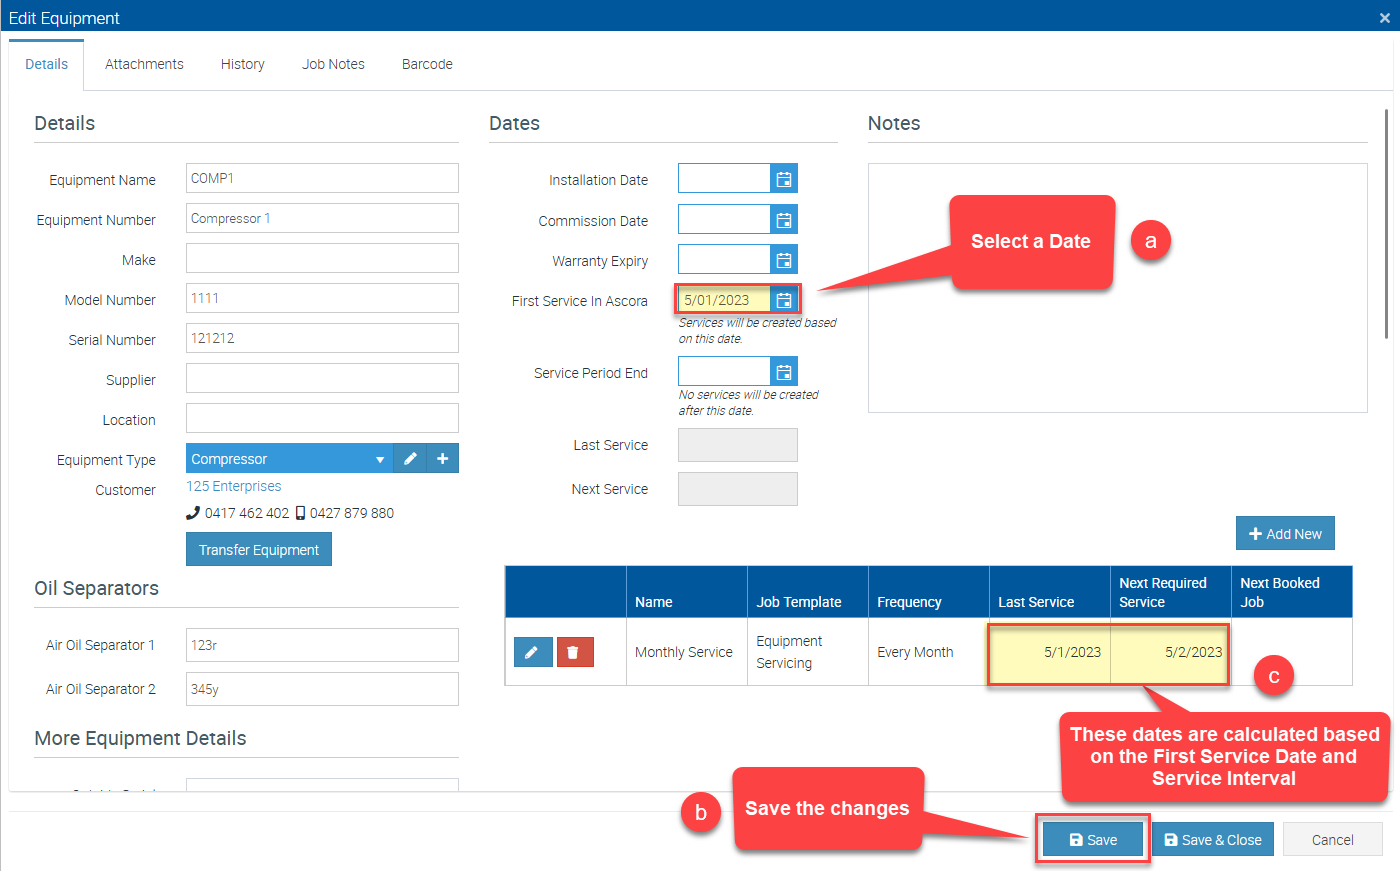
3. In the Equipment Details screen, click on + Add New to add service intervals.
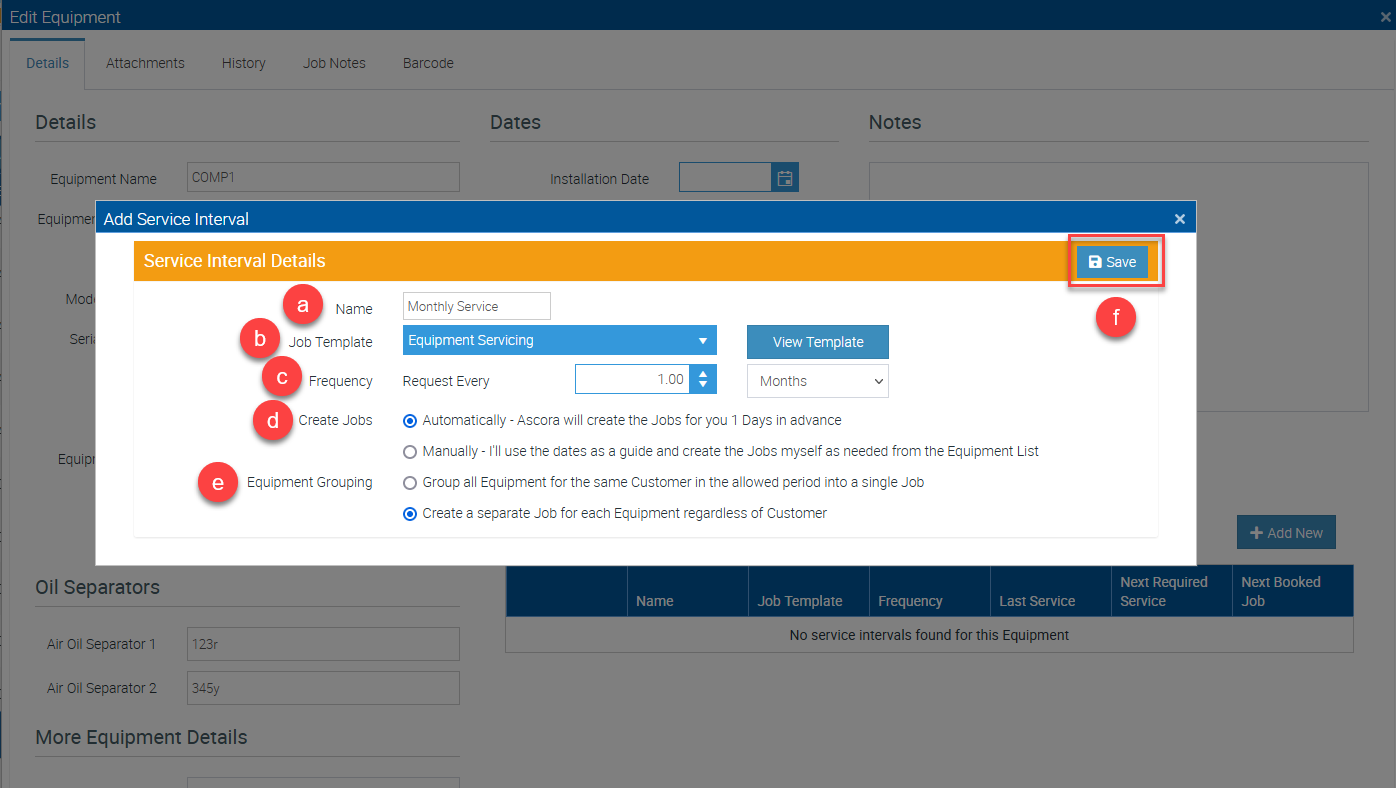
4. Complete the configurations following steps A - F as detailed below.
a. Name - Enter the Service Interval Name such as Monthly Service, Yearly Service, etc.
b. Job Template - select a job template that must have been readily created in the Advanced → Job Templates area.
c. Frequency – How often the Interval occurs.
d. Create Jobs – Specify whether you want Ascora to automatically create the necessary Jobs based on the Service Interval or if they will be manually created via the Maintenance Planner.
e. Equipment Grouping – Specify if a Job should be created for each piece of Equipment or if the multiple pieces of Equipment for the Customer that have the same Service Date should be grouped onto a single job.
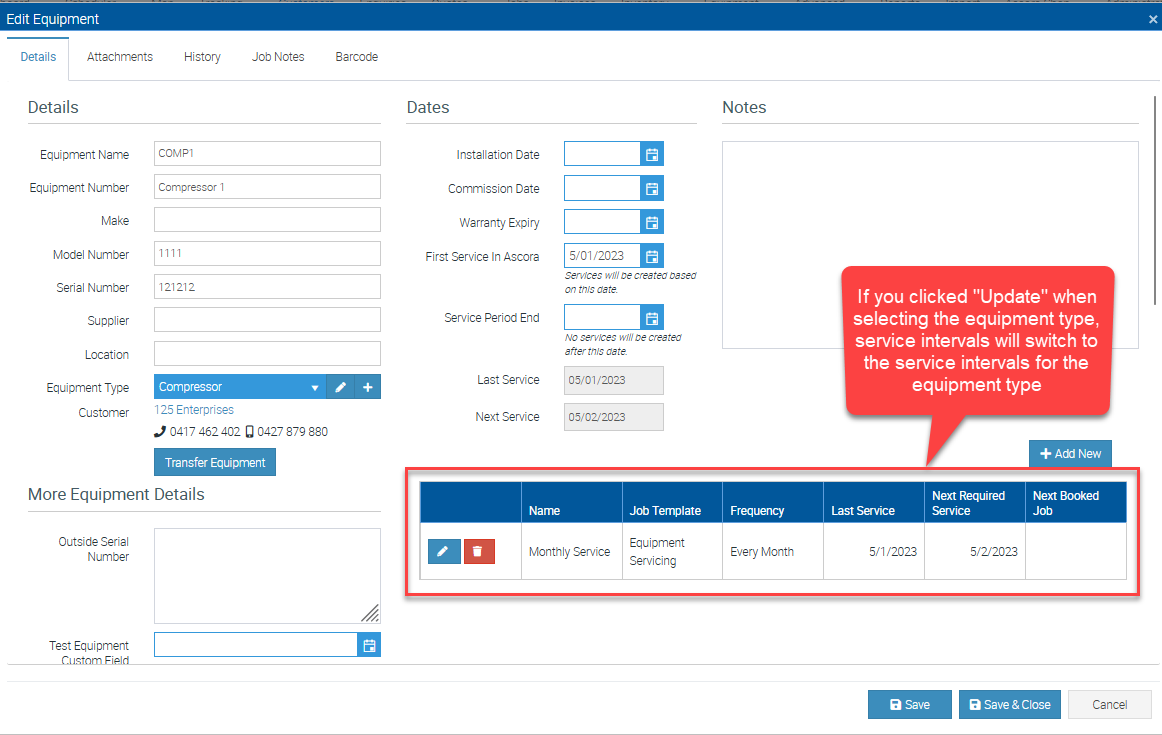
5. After saving the changes, you'll find the service interval created and listed in the lower right part of the equipment details screen.
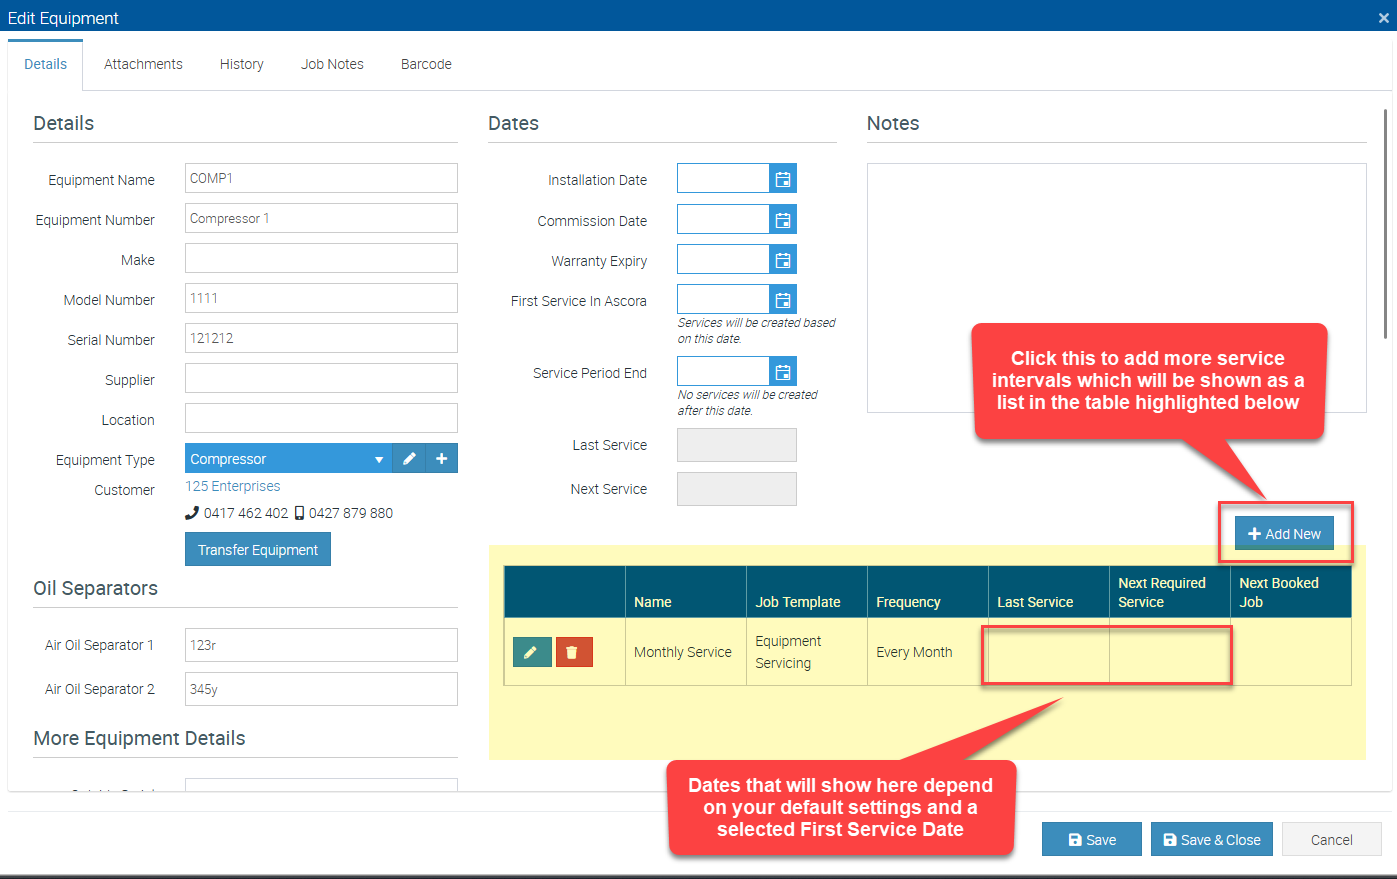
6. You can adjust the equipment details if necessary. In this example, let's add a First Service in Ascora or basically the equipment First Service Date so that the Last Service and Next Required Service Dates will show.
Adding Equipment in Customer Screen
1. To add equipment from the customer screen, access the customer details screen and navigate to the Equipment tab and click Create New Equipment.
2. Enter the information in the corresponding fields such as equipment name and equipment number. The rest of the details can be added at a later time.
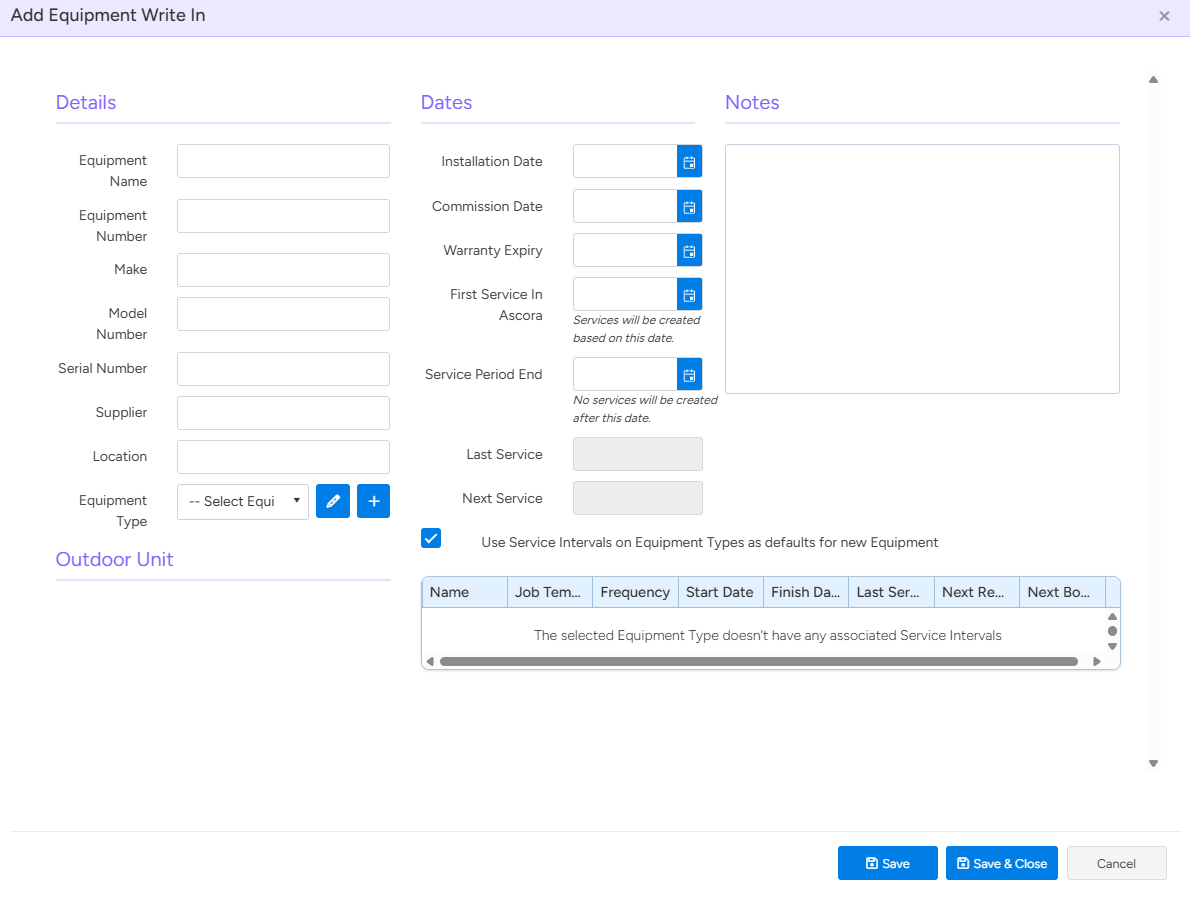
3. Select an equipment type from the drop-down list and you'll see an option to update service intervals based on the equipment type that you're selecting or just keep the existing service intervals (ones that you've added in the equipment screen using the + Add New button).
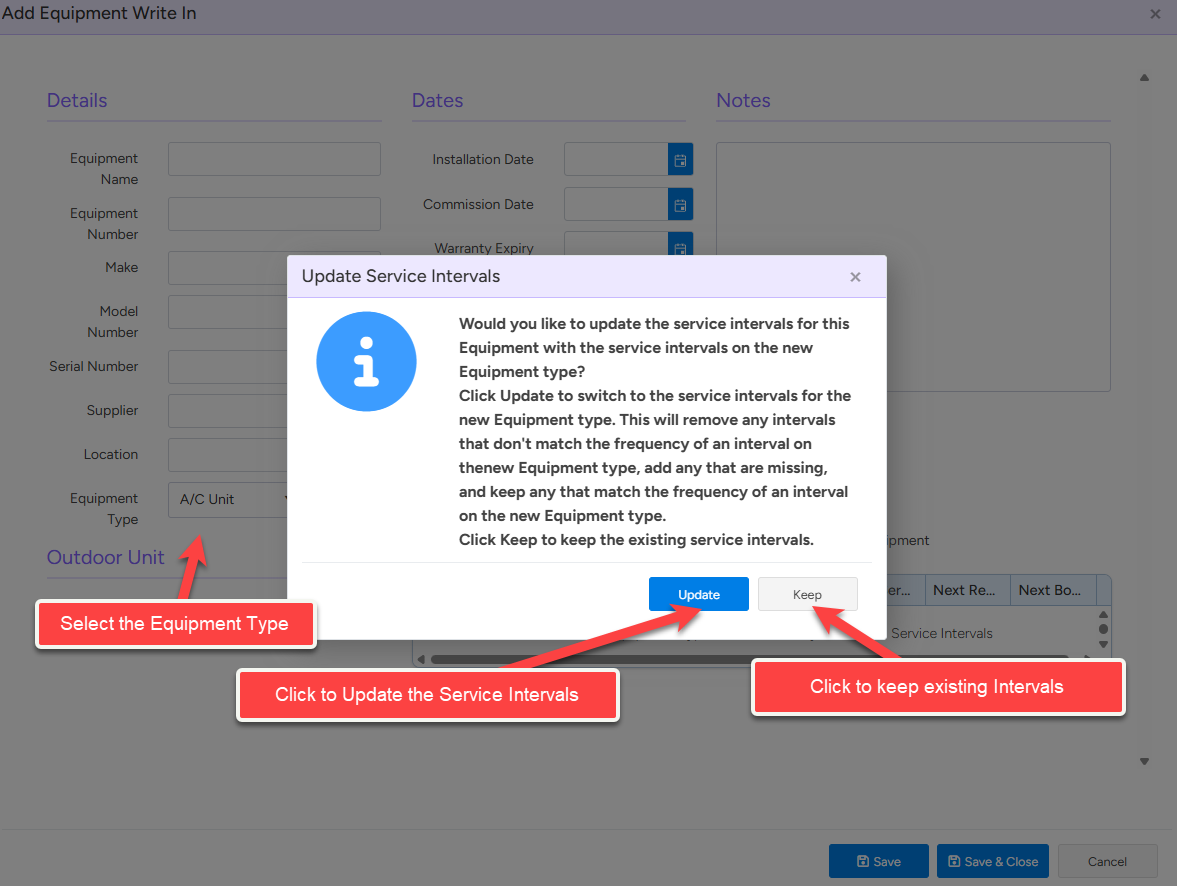
4. If you had a service interval linked to equipment and you selected "Update" this will switch to the service intervals for the equipment type.
Got a question?
Submit an Idea 💡 Go to Ideas Portal